Once you open the Catalog, the Taxonomy tree is displayed on the first panel of the screen, by default. Here, you can categorize the products into various levels and perform multiple operations on it.
Also, taxonomy nodes can be assigned meta tags and meta-attributes that provide additional information about a Node.
Once you open the catalog, the Taxonomy Hierarchy tab is displayed on the first panel of the screen, by default as shown below.

The first panel consists of two views:
Taxonomy Hierarchy - All nodes are created here. You can perform various actions on the nodes such as edit / move / copy / delete as well as link/delink assets to nodes and so on. In cases where nodes are imported through files, all such nodes will be displayed here.
Taxonomy Metadata Master – All nodes created in the taxonomy tree can be assigned a meta tag, that is, tags that provide additional information about the node. There are two types of metadata, namely, meta tags and meta-attributes.
The following table lists the privileges required to perform various functions related to taxonomy.
Privilege | Required to | Description | Prerequisites |
|---|---|---|---|
taxonomy_view | View taxonomy node hierarchy structure for the catalog | You can view the taxonomy tree in the catalog on the left-hand side panel on the screen. | catalog_open |
taxonomy_add | Add new taxonomy node in the catalog | You can add a new node at any level in the taxonomy tree of the catalog. | taxonomy_view |
taxonomy_edit | Edit taxonomy node in the catalog | You can edit any node at any level in the taxonomy tree of the catalog. This includes, but not limited to, changing the node name, level and location. | taxonomy_view |
taxonomy_delete | Delete any taxonomy node in the catalog | You can delete any taxonomy node in the catalog. | taxonomy_edit |
taxonomy_hierarchy_delete | Delete any taxonomy hierarchy in the catalog | You can delete the entire taxonomy hierarchy under the selected node in the catalog. Note: This is a catalog specific privilege, that is, this privilege should be enabled for the catalog in which this action is to be performed. | taxonomy_delete |
taxonomy_hierarchy | Access to all taxonomy hierarchies | You can access all hierarchies which will allow you to perform all actions to taxonomies under that hierarchy as defined by the related security permissions. Also, this allows you to create new taxonomy hierarchies. When this permission is disabled, you will have access only to the primary hierarchy of the catalog. | taxonomy_view |
reviewer_taxonomy_add | Review the addition of new taxonomy node | You can review the action of adding a new taxonomy node or copy structure from/to another hierarchy. | taxonomy_add |
reviewer_taxonomy_dalinkage | Review the linking or delinking of a digital asset to a taxonomy node | You can review the action of linking or delinking a digital asset to a taxonomy node. | da_link |
reviewer_taxonomy_delete | Review the deletion of a taxonomy node | You can review the action of deleting a taxonomy node, with or without SKUs. | taxonomy_delete |
reviewer_taxonomy_move | Review the movement of a taxonomy node to a different hierarchy location in the same hierarchy | You can review the action of moving a taxonomy node to a different location in the category hierarchy, with or without SKUs. | taxonomy_edit |
reviewer_taxonomy_update | Review the editing of a node name | You can review the action of editing the name of a taxonomy node. | taxonomy_edit |
*Prerequisites – This column lists the privileges that needs to be enabled first before granting the actual privilege
Working with a Taxonomy Hierarchy
All nodes will be created in the Taxonomy Hierarchy view. This is the main repository where all nodes for a catalog exist. You can add, edit, move, delete nodes as well as create a copy of nodes and link/delink them as needed.
The various functions that can be performed on nodes are explained in the following sections:
NOTE | In PCC, the taxonomy tree has three types of nodes. A node simply indicates the levels at which the products will be classified. The various nodes and its representation are listed in the following table. |
Icon | Node Name | Description |
|---|---|---|
| Root Node | Indicates the parent node in the classification tree and is the topmost node |
| Branch Node | Indicates the second level node which is subset of the parent node and will have a child node as well |
| Leaf Node | Indicates the last/lowest level node with no child node |


For example, if we are building a catalog for an e-commerce site selling various accessories such as sunglasses, watches and so on. A sample taxonomy tree can be as shown below:

NOTE | The taxonomy hierarchy is clearly depicted in the form of connecting lines as highlighted in the image above. These connecting lines will help in easily understanding the hierarchy in terms of which is the parent node and all the child nodes that are present within it. |
Creating a Taxonomy Structure using Astro
The first step in creating a catalog is to create a taxonomy tree. This includes adding nodes at various levels as explained in section Adding Nodes. However, this feature enables you to create a taxonomy structure by providing recommendations based on the data available in the Codifyd Knowledge Base (CKB). This means that if you want to develop a catalog for accessories such as watches, sunglasses and so on, you can search for nodes and if a structure exists for the same in CKB, it will be displayed. If the structure recommended based on the keyword entered is suitable, you can use that in the actual catalog.
To create a taxonomy structure using Astro:
On the Catalog action bar, select the Hierarchy drop-down list and then click the Edit Hierarchy
 icon for the hierarchy in which the structure is to be added as shown in the following figure.

In this case, there are 2 hierarchies. Let us select the Primary hierarchy. The following dialog box appears.

Turn on the Astro toggle to enable the icon for PCC Intelligence.
Click Submit and the icon is now enabled as shown below in the Taxonomy Hierarchy tab.

There are 2 cases here.
Case 1: There are no nodes in the taxonomy tree panel and you are building the structure using the recommendations.
Click the Astro icon and the following is displayed.

Type the keyword or the name of the node in the Search box and based on that, a list of options containing various structures that match the entered keyword is displayed. For example, if we are building a structure for various hardware tools. Type hardware in the Search box and then click the Search icon. The following screen appears.

Based on the context, in this case, 10 different types of structures are displayed. In case of multiple structures, you can scroll through the list and choose the appropriate one.
Select the suitable structure and then click Next as shown below.

In this case, the LED Hardware is suitable and hence it is selected.
The following screen appears.
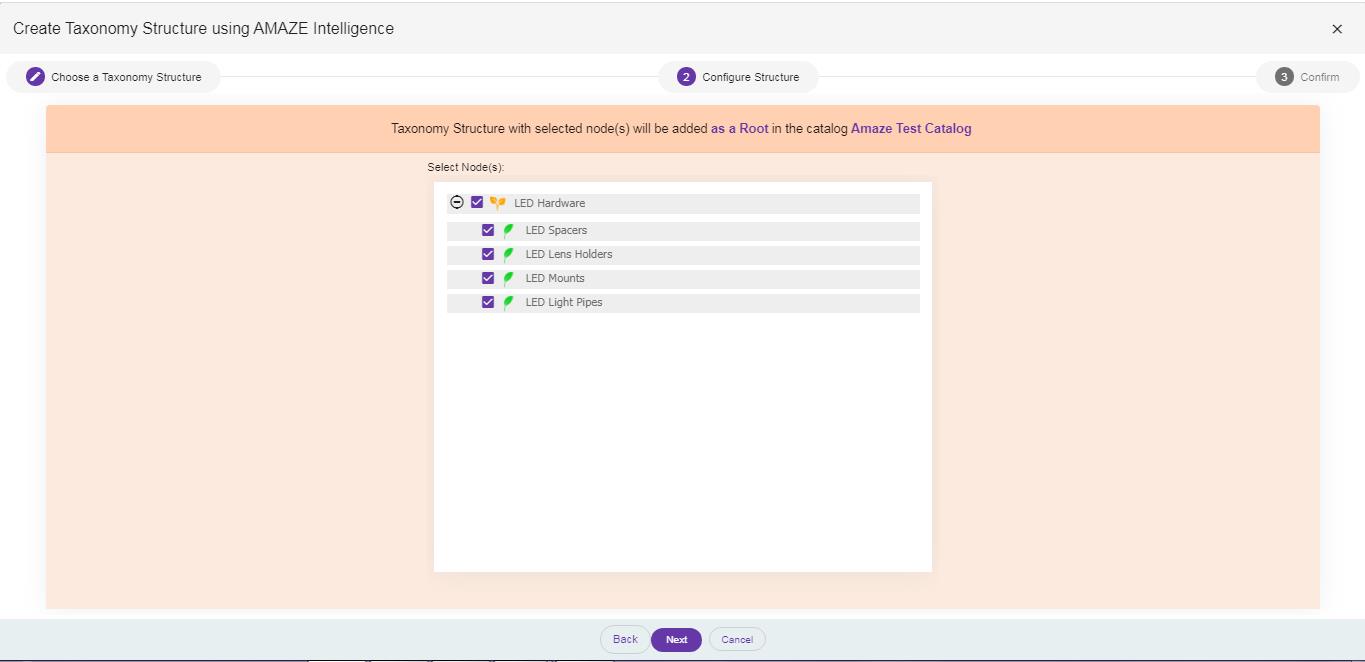
Here, the structure will be added as a root node as no nodes have been selected in the taxonomy panel. Here, you can also deselect the child nodes if it is not suitable as per the requirement. For example, the types of LED hardware displayed in the list have categories not applicable, you can deselect it.
Make the changes as needed and once the structure is configured, click Next. The finalized structure is displayed as shown below.

Click Submit and the taxonomy structure is added successfully in the taxonomy panel.
NOTE | You can also search for node names containing special characters in the keywords such as (-, & and so on). For example, if we search for a keyword Nuts & Bolts, the results will be displayed for both nuts and bolts based on the data available in the repository. |

Case 2: You have already created/imported a high level taxonomy structure and need to add more nodes in the already existing structure.
Select the node in the taxonomy tree for which you need recommendations as shown below. For example, more nodes are to be added for an existing node LED Lens Holders.
Click the Astro  icon and the recommendations are displayed based on the node selected as shown below.

The name of the node selected is displayed and the structures are displayed based on the matches found. In this case, the number of recommended structures is 10. You can view the various structures suggested to find the suitable structure.
Select the suitable structure and then click Next. In this case, the taxonomy structure with selected node(s) will be added under the selected node. In this case, under LED Lens Holders.
Make the changes as needed and once the structure is configured, click Next. If any changes are made, the finalized structure is displayed.
Click Submit and the taxonomy structure is added successfully in the taxonomy panel under the node selected as shown below.

NOTE | If you do not find the structure recommended suitable to be added, you can always add nodes as explained in section Adding Nodes. |
While adding taxonomy structures using the recommendations, if we select a structure to be added as a root node and if a root node with the same name already exists in the taxonomy panel, an error is displayed. For example, let us try adding a node Hardware as a root node which already exists as created in case 1. The following message is displayed.

If the review mode is turned on for user action Review the addition of new taxonomy node while adding/editing a hierarchy, and we are adding a structure using recommendations, the structure will be added directly and it will not be assigned to a reviewer. However, a message will be displayed stating that no review incident will be generated in this case.
For example, a structure for a product Hand Tools is being added with the review mode as On. The following message will be displayed once the structure is finalized.

Thus, taxonomy structures added using recommendation will not be assigned for review.
Adding Nodes
The first step in building a taxonomy is to add nodes based on the hierarchy required. You can add one node at a time or add multiple nodes.
NOTE | Firstly, you need to create the root node as it is the topmost level or the parent node and then you can create the child nodes based on how you want to organize your products. |
To add a node:
On the first panel, click the Add Node(s)
 icon and then click Add Root Node to add a single node or click Add Multiple Root Nodes to add multiple root nodes.

Let us assume that we are creating a taxonomy hierarchy for accessories such as watches, sunglasses and so on.
Case 1: To add a single root node
Click Add Root Node and the following screen appears:

Enter the Node Name in base locale language you selected while creating the catalog. This field is mandatory. Once you start typing the Node Name,
 icon is enabled and on clicking, it allows you to add the name in alternate language.
Enter the Customer Taxonomy ID to be assigned to the node being created. The Customer Taxonomy ID is a unique ID specific to each node which acts as an identifier for each node. For example, Acc001. This field is not mandatory and can be kept blank as well. However, if left blank, PCC will generate a numeric value for this Id, which can be changed while editing the node. However, once the customer taxonomy ID is created, it cannot be deleted. You can only update the Id as required.
Enter the Node Description. For example, A category for multiple accessories. This field can be used to provide information on the type of node. However, this field is not mandatory and can be kept blank as well.
Click Add Metadata if you need to associate any meta tag / meta Attribute to this node. The following is displayed. Refer to section Working with Taxonomy Metadata Master to know more about taxonomy metadata.

Select the Type of Metadata from the drop-down list. For example, let us associate a meta tag here.
In the Select Metadata section, a list of all available meta tags in the taxonomy metadata master list is displayed. Let us select a meta tag as tag 1.1. You can also add more meta tags or meta attributes.
Click the Remove
 icon to remove any metadata added.

A note is displayed stating that the node will be added as a root node depending on the option selected.
Click Add Node. The node is created and an icon is displayed to the right of the node name if the meta tag is associated with it and is visible in the Taxonomy Tree panel as shown below.

Hover the mouse on the metadata information icon to view the metadata associated and the following appears.

The details of the meta tag / meta attribute associated with this node is displayed. The display is clearly demarcated into two sections: one for the metatag associations, another for meta-attribute name-value pairs.
Case 2: To add multiple root nodes
Click Add Multiple Root Nodes, and the following screen appears.

Enter the Customer Taxonomy ID, Node Name and Node Description as mentioned in Case 1.
To add more nodes, click the Add More
 icon. The following screen appears.

You can enter multiple node names by clicking the Add More icon. Similarly, you can remove any node name by clicking the Remove Node icon.
icon.
Click Add Metadata if you need to associate any meta tag / meta attribute to this node. Refer steps 6 to 8 in Case 1 for more details.
Click Add Node after you have entered the names.
New root nodes are created and are visible in the Taxonomy Hierarchy panel.
However, if the review mode is turned on for user action Review the addition of new taxonomy node while adding/editing a hierarchy as explained in section 0 Adding a New Hierarchy, a root node cannot be added directly as it will be assigned to a reviewer. In this case, while adding a new root node, a message is displayed as follows.

For example, a root node Clothes is added. The taxonomy tree displays the node and a green  icon is now displayed next to the node which indicates that approval to add the node is pending as shown below.

This indicates that the node to be added is sent to the reviewer for approval.
NOTE | You cannot perform any action on this node as it is Under Review till it reaches a terminal review status. Thus, you cannot edit / delete / move / copy this node to another non-primary hierarchy / link / delink assets till the review process is complete. If you try performing any of these actions on this node which is still under review, the following is displayed.
|

Depending on the action taken by the reviewer, the request will be approved / rejected /aborted as explained in section Reviewing the User Actions Assigned
Adding Child Nodes
Once the root nodes are created, you can build the hierarchy further by adding child nodes. The various options available for a node are disabled as shown in the following figure.

As you select the node, all operations that can be performed on a node are enabled as shown below.

To add a child node:
Select the root node for which you want to add child nodes. You can either add a single child node or add multiple child nodes.
For example, in this case, we have Accessories as the root node.
Select the checkbox to the left of the node name and then click the Add Node(s)
 icon as shown below.

OR
Right-click the node name directly and select the respective option as shown below.
This option is applicable for all the nodes created.

Case 1: To add a single child node
Right-click the node and then select Add Node > Add Child Node. The following screen appears.

The name of the parent node under which the child nodes will be added is displayed on the left hand side of the screen.
Enter the Customer Taxonomy ID, Node Name, Node Description, and Metadata details, as required.
Click Add Node. For example, the node name is Sunglasses. As shown in the figure above, the node created will now be part of the root node Accessories. The child node is created and is visible in the taxonomy hierarchy panel as shown below.

Case 2: To add multiple child nodes
Right-click the node and then select Add Node > Add Multiple Child Nodes. The following screen appears:

Enter the Customer Taxonomy ID, Node Name, Node Description, and Metadata details, as required.
To add more nodes, click the Add More
 icon. The following screen appears.

You can enter multiple node names by clicking the Add More icon. For example, Jewellery and Watches are the child nodes to be added under the Accessories node. As Accessories is the selected node, the child nodes will be created under this node.
You can reorder the nodes created, that is, if there are multiple child nodes to be added, you can sort the order here itself. Hover over the  icon on the left of the Node Name and when the pointer becomes a drag arrow, drag the pointer to sort the order of the nodes as shown below.

Similarly, you can remove any node name by clicking the Remove Node icon.
icon.
You can add the metadata details as required.
Click Add Node after you have entered the required details for the nodes.
NOTE | You cannot create duplicate node names under the same parent. For example, if Watches already exists as a child node under Accessories, the system displays an error stating Watches already exists as shown below. |

However, a node with the name Watches can be created under a different parent node.
Make the necessary changes, that is, only one node name as Watches is part of Accessories now and the child nodes are visible in the Taxonomy Hierarchy panel.

However, if the review mode is turned on for user action Review the addition of new taxonomy node while adding/editing a hierarchy, you cannot add child nodes directly as it will be assigned to a reviewer. In this case, when you add a child node, a message is displayed.
When a child node is added, the taxonomy tree displays the node and a green  icon is now displayed next to the node which indicates that approval to add the node is pending as explained here.
Depending on the action taken by the reviewer, the request will be approved / rejected / aborted as explained in section Reviewing the User Actions Assigned.
Adding a Node/Multiple Nodes Before/After the Selected Node
In a real case scenario, you will have to build a taxonomy for multiple products which will have to be categorized under various root/branch/child nodes depending upon the hierarchy needed. Hence, functions like adding nodes before/after a node will enable you to organize the products easily.
To add nodes before or after the selected node, select the node and right-click as shown below.

The terms ‘before’ and ‘after’ simply means that the display order of the nodes will be above and below the selected node respectively. However, the nodes will be added at the same level in the hierarchy, that is, any node added will belong to the same parent node.
Table 8: Adding nodes/ multiple nodes before/after selected node
To | Do this | Remember |
|---|---|---|
Add Node Before |
Note: You can add Customer Taxonomy ID, Node Description, and Metadata details, as required. It is mandatory to select a node to perform this action. | A node to be added will become a root/child node depending on the node selected. For example, if the selected node is a branch node, and we want to add a node before it. Let us add a node before Sunglasses.
The node will be added as a child node just before the branch node. Here, a node Temp is added before Sunglasses. It will be added as a child node of Accessories.
Thus, you can add nodes in any order based on the hierarchy you need for the products. |
Add Node After |
Note: You can add Customer Taxonomy ID, Node Description, and Metadata details, as required. It is mandatory to select a node to perform this action. | |
Add Multiple Nodes Before |
Note: You can add Customer Taxonomy ID, Node Description, and Metadata details, as required. It is mandatory to select a node to perform this action. | |
Add Multiple Nodes After |
Note: You can add Customer Taxonomy ID, Node Description, and Metadata details, as required. It is mandatory to select a node to perform this action. |


 icon to add more nodes.
 icon to add more nodes.
However, if the review mode is turned on for user action Review the addition of new taxonomy node while adding/editing a hierarchy, you cannot add a node / multiple nodes before/after the selected node directly as it will be assigned to a reviewer.
The taxonomy tree displays the node and a green  icon is now displayed next to the node which indicates that approval to add the node is pending as explained here.
Depending on the action taken by the reviewer, the request will be approved / rejected / aborted as explained in section Reviewing the User Actions Assigned.
Editing Nodes
Once you have added nodes, you can edit a single node or edit multiple nodes too. You can change the names of the nodes, node description and customer taxonomy ID as well as add metadata information for existing nodes.
Case 1: To edit a single node
Select the node and then select the Edit Node(s)
 icon and then click Edit Node as shown below.

OR
Right-click a single node and then select Edit Node > Edit Node. For example, a node Watches is selected. The following screen appears.

Edit the Node Name / Customer Taxonomy ID / Node Description and add metadata information as needed. Let us add a meta attribute for an already existing node.
Click Add Metadata to associate a meta attribute to this node. The following is displayed.

Select the Type of Metadata as Meta Attribute from the drop-down list.
In the Select Metadata section, click to select a meta attribute from a list of all available meta attributes in the taxonomy metadata master list. Let us select a meta attribute as Product Type. You can also add more meta tags or meta attributes.
In the Add Value section, add a value for the meta attribute selected to bring more clarity. Let us add a value as Types of analog and digital watches.

NOTE | You can add multiple meta tags or meta attributes to nodes as needed. |
Click Edit Node. All the details edited are updated as well as the meta attribute is added and displayed in the Taxonomy Hierarchy.

Thus, you can associate meta tags or meta-attributes to already existing nodes by editing the nodes.
Case 2: To edit multiple nodes
Select the nodes you need to edit. Right-click them and then select Edit Node > Edit Multiple Nodes. The following screen appears.

The list of nodes selected is displayed. Edit the node details such as metadata information / node name / node description, as needed.
Click Edit Node. The node details are updated and displayed in the Taxonomy hierarchy.
However, if the review mode is turned on for user action Review the editing a node name while adding/editing a hierarchy, a node cannot be edited directly as it will be assigned to a reviewer. In this case, while editing a node name, a message is displayed as follows.

NOTE | If the review mode is on, while editing a node name, you cannot edit it directly as it is sent for review. However, if you only add a metadata information while editing a node, it will be updated as changes to taxonomy metadata are not eligible for review. |
For example, node Sunglasses is edited. The taxonomy tree displays a purple  icon next to the node which indicates that approval to edit the node name is pending as shown below.

Thus, the node to be edited is sent to the reviewer for approval.
NOTE | You can add a node under this node as well as link / delink assets to this node which is under review. However, you cannot edit / delete / move / copy this node to another non-primary hierarchy till the review process is complete. Also, you can perform all Schema and SKU related actions on this node which is under review. |
Depending on the action taken by the reviewer, the request will be approved / rejected /aborted as explained in section Reviewing the User Actions Assigned.
Moving Nodes
You can move nodes to any position in the taxonomy hierarchy. Also, you have the option of moving / deleting SKUs within the nodes which are as follows:
Moving Node with SKUs – Enables you to move the selected node along with the SKUs present in the node
Moving Node without SKUs – Enables you to move the selected node without its SKUs, that is, the SKUs present in this node can be retained in the parent node/ moved to a different node as well as the SKUs can be deleted if not relevant anymore
Move Node as a Root Node – Enables you to move the selected node as a root node, that is, this node will now become a root node and the SKUs present in the node can be moved along with the node / moved to a different node as well as the SKUs can be deleted if not relevant anymore
This feature is especially useful in rearranging the nodes and the SKUs based on the changing business needs of the customer as the SKUs need not be impacted if nodes are to be moved. SKUs can be easily moved and deleted within the taxonomy hierarchy based on the options available.
NOTE | You can only move one node at a time as there are multiple options available while moving a node. |
A detailed description of the above-mentioned features is provided in the following sub-sections.
There are 2 ways to move a node in the taxonomy tree which are as follows:
Select the node. Select the Move Nodes
 icon and then select the respective options. This method is described in detail in the following sections.

Another option is to select and drag the node and place it directly within the required node. For example, let us assume we want to move a node Rectangular under node Accessories as shown in the following figure.

The following screen appears.
A detailed description of each of the options displayed is provided in the following sections.
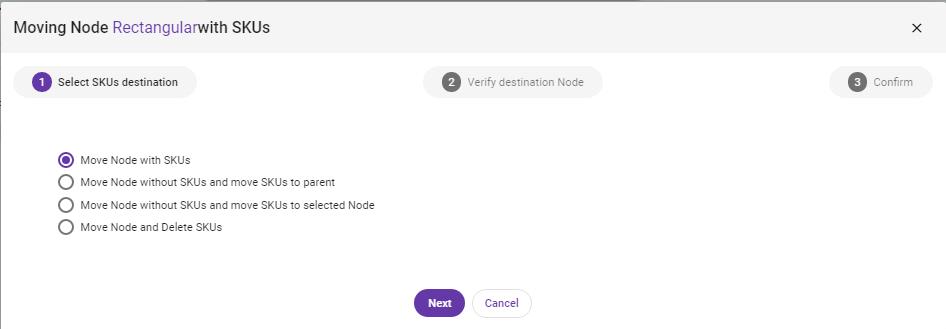
Move Node with SKUs
Here, you can move the selected node with SKUs, that is, all the SKUs present in the node will stay in this node and will be moved along with the node at the selected location.
To move node with SKUs:
Select the node and then select the Move Nodes
 icon. Click Move Node with SKUs or right-click the node to be moved and then select Move Node > with SKUs. The following screen appears. For example, in this case, the node Rectangular is to be moved.

The screen indicates which node is to be moved. There are 2 steps to be performed.
Select the destination node. The taxonomy displayed will show all the nodes available except the one selected, that is, the node Rectangular is not displayed as it is the source node.

Here, Accessories is the selected destination. An information is displayed at the bottom of the screen indicating the destination node based on the node selected.
Click Next. The following screen appears.

Complete information about the node selected for moving is displayed before you confirm the process. Also, here you can select whether you want to keep or delete any inherited schema attributes while moving the node.
NOTE | This option appears only if there are any inherited schema attributes. |
By default, Delete Inherited Schema Attribute(s) from Parent Node is selected. Refer Schema Inheritance section for more information on inherited schema attributes.
Click Yes, I Confirm if you are sure about the changes. Also, if you think you have selected the wrong node, click Back to go back and make the necessary changes. The following screen appears after you click Yes, I Confirm.

Click OK and the changes are reflected in the taxonomy tree.
Move Node without SKUs
Here, you can move a node without it’s SKUs, that is, the node can be moved at a different position in the hierarchy and the SKUs present in this node can be moved to a different location or can be deleted as well. Following are the options.
Move Node without SKUs and move SKUs up to a Parent Node
You should select this option if you want to move a branch/child node to some other position in the taxonomy tree but want to retain the SKUs in the same parent node.
To move node without SKUs and move SKUs to a parent node:
Right-click the node to be moved and then select Move Node > without SKUs and > move SKUs up to a Parent Node.
Select the destination node. For example, if a node Rectangular is to be moved to a node Sunglasses, Sunglasses is the selected destination. Information is displayed at the bottom of the screen indicating the destination node as shown below.

Click Next. The following screen appears.

A complete information about the node selected for moving along with the details about SKUs is displayed before you confirm the process. Here, though the node Rectangular is moved to Sunglasses, the SKUs of Rectangular will remain in Accessories.
Click Yes, I Confirm if you are sure about the changes.
Click OK and the changes are reflected in the taxonomy tree.
Move Node without SKUs and move SKUs to different user-chosen Node
You should select this option if you want to move a node to some other position in the taxonomy tree and move SKUs present in this node to a different node.
To move node without SKUs and move SKUs to a different user-chosen node:
Right-click the node to be moved and then select Move Node > without SKUs and > move SKUs to different user-chosen Node.
Select the destination node for the selected node. For example, if a node Digital is to be moved to Accessories, so Accessories is the selected destination. An information is displayed at the bottom of the screen indicating the destination node as shown below.

Click Next. The following screen appears.

Select the node where you want to move the SKUs. For example, if Analog is the selected destination for moving SKUs. So, all the SKU’s of Digital will now move to Analog. An information is displayed at the bottom of the screen indicating the destination node for moving SKUs as shown below.

Click Next. The following screen appears.

A complete information about the node selected for moving along with the details about SKUs is displayed before you confirm the process.
Click Yes, I Confirm if you are sure about the changes.
Click OK and the changes are reflected in the taxonomy tree.
Move Node without SKUs and delete SKUs
You should select this option if you want to move a node to some other position in the taxonomy tree, but the SKUs present in this node are no longer required or relevant as the SKUs will be deleted.
To move node without SKUs and delete SKUs:
Right-click the node to be moved and then select Move Node > without SKUs and > delete SKUs.
Select the destination node. An information is displayed at the bottom of the screen indicating the Destination Node.
Click Next. A complete information about the node selected for moving along with the details about SKUs is displayed before you confirm the process.
Click Yes, I Confirm if you are sure about the changes.
Click OK and the changes are reflected in the Taxonomy tree, that is, the node is moved, and the SKUs are deleted.
Move Node as a Root Node
You should select this option if you want to move a branch/child node as a root node, that is, the selected node becomes a root node and the SKUs present in this node can be moved together with the node / to a different destination or can be deleted as well. Following are the options.
Move Node as a Root Node with SKUs
You should select this option if you want to move a branch/child node as a root node in the taxonomy tree and all the SKUs present in the node will stay in this node and will be moved along with the node at the selected location.
To move node as a root node with SKUs:
Right-click the node to be moved and then select Move Node > as a Root Node > with SKUs.
A complete information about the node selected for moving along with the details about SKUs is displayed before you confirm the process.
Click Yes, I Confirm if you are sure about the changes.
Click OK and the changes are reflected in the Taxonomy tree.
Move Node as a Root Node without SKUs and move SKUs to different user-chosen Node
You should select this option if you want to move a branch/child node as a root node in the taxonomy tree and all the SKUs present in this node can be moved to a different node.
To move node as a root node without SKUs and move SKUs to a different user-chosen node:
Right-click the node to be moved and then select Move Node > as a Root Node > without SKUs and move SKUs to a different user-chosen Node.
Select the destination node for the SKUs of the selected node.
Click Next. A complete information about the node selected for moving along with the details about SKUs is displayed before you confirm the process.
Click Yes, I Confirm if you are sure about the changes.
Click OK and the changes are reflected in the taxonomy tree.
Move Node as a Root Node and delete SKUs
You should select this option if you want to move a branch/child node as a root node in the taxonomy tree, and the SKUs present in this node will be deleted as they are no longer required or relevant.
To move node as a root node and delete SKUs:
Right-click the node to be moved and then select Move Node > as a Root Node > and delete SKUs.
A complete information about the node selected for moving along with the details about SKUs is displayed before you confirm the process.
Click Yes, I Confirm if you are sure about the changes.
Click OK and the changes are reflected in the taxonomy tree.
NOTE | If the nodes being moved have SKUs with locked attributes as explained in section Locking Attribute Values for a SKU, a warning message is displayed stating that the lock applied on the attribute(s) residing in the SKUs which belongs to the selected node will be removed on performing this action as shown below. |

However, if the review mode is turned on for user action Review the movement of a taxonomy node to a different hierarchy location in the same hierarchy while adding/editing a hierarchy, you cannot move the nodes with SKUs / without SKUs / as a root node directly as it will be assigned to a reviewer. In this case, while moving the node to a different location, a message is displayed as follows.

For example, a node Digital is moved with SKUs. In this case, the node is not moved and an orange  icon is now displayed next to the node which indicates that approval to move the node to a different location is pending as shown below.

NOTE | You cannot perform any action on this node as it is Under Review till it reaches a terminal review status. Thus, you cannot add a node under this node / edit / delete / move / copy this node till the review process is complete. However, for the same node, you can link/delink Digital Assets. Also, you cannot perform any schema actions on this node. In the case of SKUs under this node, you can only mirror them to another hierarchy but you cannot perform any other SKU actions. |
Depending on the action taken by the reviewer, the request will be approved / rejected / aborted as explained in section Reviewing the User Actions Assigned.
Deleting Nodes and Taxonomy Hierarchy
In case of nodes, you have the option to either delete specific nodes or you can delete the entire hierarchy below the selected node. Thus, if you need to delete a single node or any leaf nodes, it is best to delete those nodes specifically whereas if you need to delete a complete hierarchy that is branch / root nodes along with the nodes below it, you can delete the entire hierarchy.
NOTE | While deleting the entire hierarchy, you cannot choose the nodes to be deleted under the hierarchy. By default, all the nodes in the hierarchy will be deleted. |
While deleting nodes, you have the option to choose if you want to delete the SKUs present in these nodes / move the SKUs to a different node / move the SKUs to the parent node of the node being deleted.
NOTE | If the selected node is a root node, you will get only 2 options for the SKUs, that is, Delete all SKUs / Move SKUs to a selected node. Since the root node is the topmost node, you cannot move the SKUs to a parent node. |
Let us understand how to delete specific nodes as well as the taxonomy hierarchy in the following sections.
Deleting Nodes
You can delete the nodes created but you can decide whether you want to retain the SKUs or delete them as well while deleting the nodes. Following are the various options.
NOTE | You can only delete one node at a time. |
To delete a single node, select the node. Select the Delete Nodes icon and then click Delete Node and chose the respective options as shown below.

The various options are described in detail in the following sections.
Delete Node and Move SKUs up to a Parent Node
You should select this option if you need to delete a node that is no longer relevant but retain the SKUs and move them to a parent node. In this case, the SKUs from the node being deleted will move to the parent node of the node being deleted.
To delete a node and move SKUs up to a parent node:
Select the node and then select the Delete Nodes
 icon and then click Delete Node and move SKUs up to a Parent Node or right-click the node and then select Delete Node(s) > Delete Node > and move SKUs up to a Parent Node.
A complete information about the node selected for deletion along with the name of the parent node where the SKUs will be moved is displayed before you confirm the process.
Click Yes, I Confirm if you are sure about the changes.
Click OK and the changes are reflected in the Taxonomy tree.
Delete Node and Move SKUs to different user-chosen Node
You should select this option if you need to delete a node but retain the SKUs and move them to a different node. In this case, the SKUs from the node being deleted will move to the node which is selected for the SKUs to be moved.
To delete a node and move SKUs to different user-chosen node:
Right-click the node and then select Delete Node(s) > Delete Node > and move SKUs to different user-chosen Node.
Select the destination node for the SKUs of the selected node and click Next.
A complete information about the node selected for deletion along with the name of the node that you have selected for moving the SKUs is displayed before you confirm the process.
Click Yes, I Confirm if you are sure about the changes.
Click OK and the changes are reflected in the Taxonomy tree.
Delete Node and Delete SKUs
You should select this option if you need to delete the SKUs along with the node as they are no longer relevant.
To delete a node and delete SKUs:
Right-click the node and then select Delete Node(s) > Delete Node > and delete SKUs.
A complete information about the node selected for deletion along with the information that the SKUs will be permanently deleted is displayed before you confirm the process.
Click Yes, I Confirm if you are sure about the changes.
Click OK and the changes are reflected in the taxonomy tree.
However, if the review mode is turned on for user action Review the deletion of a taxonomy node while adding/editing a hierarchy, you cannot delete the nodes with SKUs / without SKUs directly as it will be assigned to a reviewer. In this case, while deleting the node, a message is displayed as follows.

For example, a node Analog is deleted with SKUs. In this case, the node is not deleted and a red  icon is now displayed next to the node which indicates that approval to delete the node is pending as shown below.

NOTE | You cannot perform any action on this node as it is Under Review till it reaches a terminal review status. Thus, you cannot add a node under this node / edit / delete / move / copy this node / link / delink digital assets till the review process is complete. Also, you cannot perform any schema and SKU related action on this node which is under review. |
Depending on the action taken by the reviewer, the request will be approved / rejected / aborted as explained in section Reviewing the User Actions Assigned.
Deleting Taxonomy Hierarchy
You can delete the entire hierarchy of the selected node only if you have the privilege to perform this action. The Taxonomy Hierarchy Delete privilege is a catalog specific privilege. Hence, if you have been assigned this privilege, you can delete the node hierarchy, that is, all the nodes under the selected node. This privilege will be granted only if you have the privilege to delete a single node. Thus, you can delete multiple nodes only if you have the rights to delete a single node.
NOTE | If you do not have the Taxonomy Hierarchy Delete privilege, this option will be disabled and you will only be able to delete a single node. |
This feature is useful in cases where you know that the entire hierarchy is no longer relevant and can be removed but you can decide whether you want to retain the SKUs or delete them as well while deleting the taxonomy hierarchy.
To delete a taxonomy hierarchy, select the node for which the hierarchy is to be deleted. Select the Delete Nodes icon and then click Delete Node Hierarchy and choose the respective options as shown below.

The various options are described in detail in the following sections.
Delete Node Hierarchy and Move SKUs up to a Parent Node
You should select this option if you need to delete a node hierarchy that is no longer relevant but retain the SKUs and move them to a parent node. In this case, all the SKUs from the nodes being deleted in the hierarchy will move to the parent node of the node being deleted.
NOTE | This option will be disabled if the node selected is a root node. |
To delete the node hierarchy and move SKUs up to a parent node:
Select the node and then select the Delete Nodes
 icon and then click Delete Node Hierarchy > and move SKUs up to a Parent Node or right-click the node and then select Delete Node(s) > Delete Node Hierarchy > and move SKUs up to a Parent Node.
A complete information about the node hierarchy selected for deletion is displayed along with the name of the parent node where the SKUs will be moved before you confirm the process. You can also see the complete hierarchy, that is, all the nodes that will be deleted by clicking the '+' icon.

Click Yes, I Confirm if you are sure about the changes.
Click OK and the changes are reflected in the Taxonomy tree.
Delete Node Hierarchy and Move SKUs to different user-chosen Node
You should select this option if you need to delete a node hierarchy but retain the SKUs and move them to a different node. In this case, all the SKUs from the nodes being deleted will move to the node which is selected for the SKUs to be moved.
To delete a node hierarchy and move SKUs to different user-chosen node:
Right-click the node and then select Delete Node(s) > Delete Node Hierarchy > and move SKUs to different user-chosen Node.
Select the destination node for the SKUs of the selected nodes and click Next.
A complete information about the nodes selected for deletion along with the name of the node that you have selected for moving the SKUs is displayed before you confirm the process. You can also see the complete hierarchy, that is, all the nodes that will be deleted by clicking the '+' icon.
Click Yes, I Confirm if you are sure about the changes.
Click OK and the changes are reflected in the Taxonomy tree.
Delete Node Hierarchy and Delete SKUs
You should select this option if you need to delete the SKUs along with the nodes as they are no longer relevant.
To delete nodes along with the SKUs:
Right-click the node and then select Delete Node(s) > Delete Node Hierarchy > and delete SKUs.
A complete information about the node selected for deletion along with the information that the SKUs will be permanently deleted is displayed before you confirm the process. You can also see the complete hierarchy, that is, all the nodes that will be deleted by clicking the '+' icon.
Click Yes, I Confirm if you are sure about the changes.
Click OK and the changes are reflected in the taxonomy tree.
However, if the review mode is turned on for user action Review the deletion of a taxonomy hierarchy while adding/editing a hierarchy, you cannot delete the node hierarchy with SKUs / without SKUs directly as it will be assigned to a reviewer. In this case, while deleting the hierarchy, a message is displayed as follows.
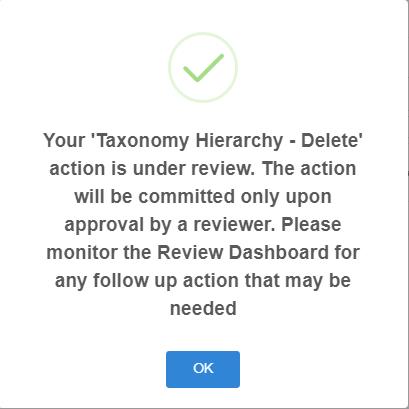
For example, a node Tapes with a child node Masking Tapes is deleted with SKUs moved to the parent node. In this case, the node hierarchy is not deleted and a dark red  icon is now displayed next to the parent node along with all the child nodes that will be deleted in the hierarchy which indicates that approval to delete the hierarchy is pending as shown below.

NOTE | You cannot perform any action on all the nodes in hierarchy as it is Under Review till it reaches a terminal review status. Thus, you cannot add a node under these nodes / edit / delete / move / copy this node / link / delink digital assets till the review process is complete. Also, you cannot perform any schema and SKU related action on the nodes which are under review. |
Depending on the action taken by the reviewer, the request will be approved / rejected / aborted as explained in section Reviewing the User Actions Assigned.
NOTE | In both cases, when a specific node is being deleted / an entire hierarchy is being deleted, if the SKUs in the nodes are being moved and not being deleted, all SKUs having locked as explained in section Locking Attribute Values for a SKU, a warning message is displayed stating that the lock applied on the attribute(s) residing in the SKUs which belongs to the selected node will be removed on performing this action as shown below. |

Copying Nodes
You can copy nodes from one hierarchy to another hierarchy. A hierarchy is a workspace where the catalog is designed. A primary hierarchy is the first hierarchy created by default, which is the main workspace. A detailed information about hierarchies and its features are described in section Using a Hierarchy.
If you have multiple hierarchies in your catalog and these hierarchies have a common taxonomy structure, this feature is useful in creating a copy of an existing node in another hierarchy.
NOTE | You can copy nodes only if you have another hierarchy created. In the case of primary hierarchy, you can copy nodes from the primary hierarchy to any other hierarchy. However, you cannot copy a node from another hierarchy to the primary hierarchy as it is the main workspace where the entire catalog exists. Also, all the metadata information associated with a node will also be copied during this process. However, after the successful copy, you can go to the hierarchy where the node is copied and change the metadata. |
There are two options to copy a node. You can copy node:
Copy Node to Another Hierarchy
You can use this option to copy a node along with its schema, SKUs and so on to another hierarchy.
To copy a node to another hierarchy:
Right-click the node to be copied and then select Copy Node > to another Hierarchy.

The following screen appears.

For example, the node Watches is to be moved to another hierarchy. The node selected is displayed as highlighted in the figure above. There are 4 steps to be completed.
Click Next to proceed.

Here, you can decide whether you want to copy the node with all/partial schema elements or without schema elements. More information about schema elements is detailed in Defining Schemas.
Select the relevant option and then click Next. The following screen appears.

Here, you need to select the destination hierarchy where you want to copy the node. Here, all other hierarchies except the one from where the node is being copied will be displayed.
Select the Destination hierarchy. As soon as you select the hierarchy, another option is displayed as shown below.

Here, select whether the node to be copied should be copied as a root/child node.
NOTE | If you select the node to be copied as a child node, it is mandatory to have a root node already created in the destination hierarchy where the child node will be placed. |
Select the node and then click Next. The following screen appears.

A detailed information about the node being copied (number of nodes) along with the relevant details is displayed.
Click Yes, I Confirm if you are sure about the changes.
Click OK and the node is copied successfully to another hierarchy (that is, the selected hierarchy).
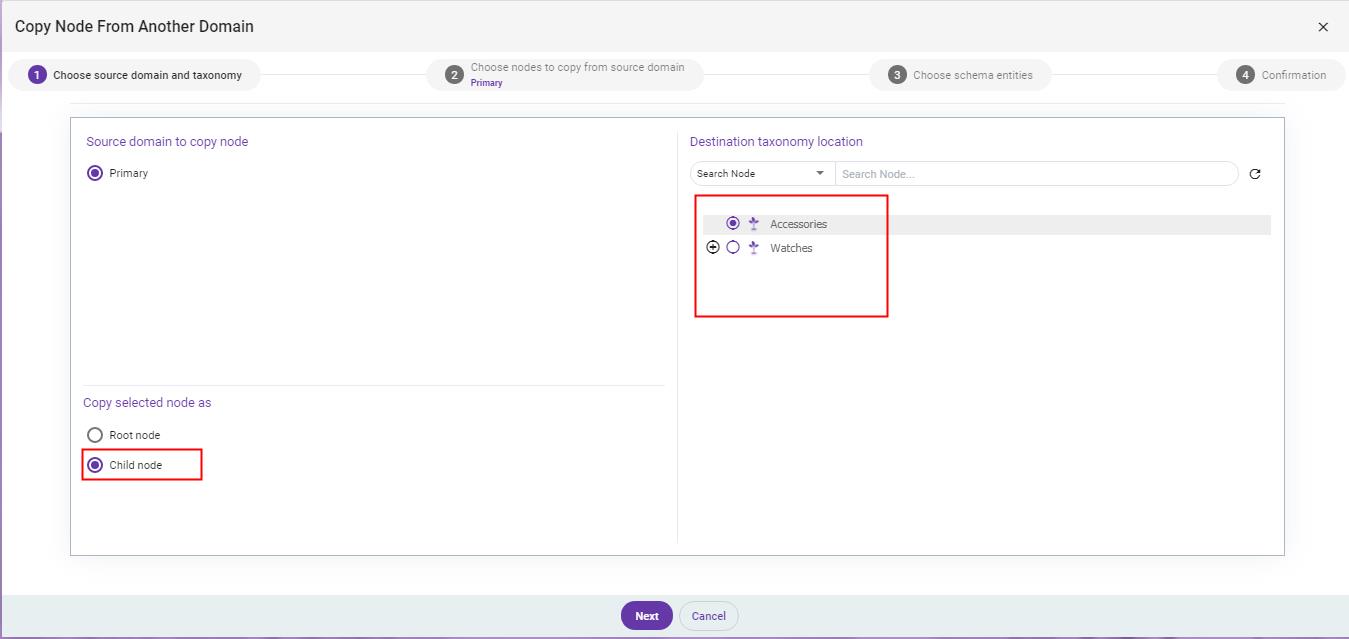
Copy Node from Another Hierarchy
You can use this option to copy a node along with its schema entities from another hierarchy to a non-primary hierarchy. As mentioned, this option cannot be used for the primary hierarchy as nodes cannot be copied here.
To copy a node from another hierarchy:
Right-click the node where you want to copy a node (this will be the destination node) from another hierarchy and then select Copy Node > from another Hierarchy. For example, let us copy a node to the Secondary hierarchy from the Primary hierarchy. Since the node should be copied to the Secondary hierarchy, select the node in this hierarchy.
The following screen appears.

There are 4 steps to be completed. Here, I need to copy a node from the primary hierarchy. So, it will be my source hierarchy.
Select the Source Hierarchy from where you need to copy the node (in this case, Primary) and then click Next to proceed. As soon as you select the hierarchy, another option is displayed as shown below.

Here, select whether the node to be copied should be copied as a root/child node.
NOTE | If you select Child Node, you need to select the exact location in the destination taxonomy. The following screen is displayed. |
Select the exact location where you need to paste the node and then click Next. The following screen appears.

Next, you need to select the node you want to copy from your selected hierarchy. In this case, all the available nodes in the Primary hierarchy are displayed.
Select the node to be copied and then click Next. However, it is important to understand that you cannot select nodes randomly. There must be a logical association in the selection, that is, you cannot randomly select a child/branch node to be copied. You need to select the complete hierarchy if you need to copy a branch/child node. You can, however, select a root node on its own.
Select the schema entities to be copied and then click Next. Detailed information about the node to be copied along with the relevant details is displayed.
Click Yes, I Confirm if you are sure about the changes.
Click OK and the node is copied successfully from another hierarchy.
Linking/Delinking Digital Assets to/from a Node
You can link/delink digital assets to/from a node. A detailed description of digital assets, its features, uses and so on are detailed in Digital Assets section. Refer to this chapter for more details. In this section, we will understand how to link and delink assets to a node.
To link digital assets to a node:
Select the node and then select the Assets
 icon and then click Link Assets as shown below. For example, let us link an asset to node Watches.

OR
Right-click the node and then select Assets > Link Assets as shown below.

The Digital Assets library page is displayed as shown below.

2. Select the asset (it could be pictures, videos, diagrams, and so on) to be linked with the node and then click Next.
Details of the asset which will be linked to the node are displayed.

Click Submit and the asset is linked successfully. The details of the asset now reflect in the taxonomy tree as well when you select the Linked Digital Assets option using the
 icon.
icon.

Hover the mouse on the count displayed to view the linked assets. Click View Details and the following screen appears.

A complete detail of the assets is displayed such as the name, type and active from and through dates. The first asset linked will always be a primary asset indicated by  icon, by default. Once multiple assets are linked to nodes, you can choose which asset should be set as primary. The Active Linkages and the Inactive Linkages tab shows the list of assets that are active and inactive respectively for the selected nodes.
NOTE | For a node that already has assets linked, while linking another asset to the same node, you can view the already linked assets as shown in the following figure. This link is displayed only if a node already has an asset linked to it. |

4. Click Linked Assets and the assets already linked for the selected node are displayed as shown below.

Similarly, you can delink assets from nodes that have assets associated to them and are no longer relevant.
To delink digital assets from a node:
Right-click the node and then select Assets > Delink Assets. A list of assets linked to the selected node are displayed as shown below.

Select the asset to be delinked and then click Submit. The assets are delinked from the node successfully.
However, if the review mode is turned on for user action Review the linking or delinking a digital asset to a taxonomy node while adding/editing a hierarchy, you cannot link/delink assets to/from a node directly as it will be assigned to a reviewer. In this case, while linking/delinking assets to/from a node, a message is displayed as follows.

Also, the node is not linked to the asset and a blue  icon is now displayed next to the node which indicates that approval to link/delink the node to an asset is pending as shown below.

NOTE | You cannot delete this node which is Under Review till it reaches a terminal review status. However, you can add a node under this node / edit / copy / move this node / link / delink assets to this node. You can also perform all schema and SKU related action on this node which is under review. |
Also, you can view the number of linked assets under review at the node level. Click the Show/Hide Node Related Information icon in the taxonomy panel and click Linked Digital Assets under Review as shown below.


The count of assets under review in each node is displayed. When you hover the mouse on the count, the thumbnail of the asset is displayed.
Depending on the action taken by the reviewer, the request will be approved / rejected / aborted as explained in section 19.4 Reviewing the User Actions Assigned.
Downloading Assets Linked to Nodes
You can download assets linked to all taxonomy nodes as well as assets linked to selected nodes. This feature is useful when you need a list of assets linked to all / selected nodes in a catalog.
To download assets from the taxonomy panel:
Click the Assets
 icon and then click Download Assets as shown below.

There are two options here.
Case 1: Assets linked to all taxonomy nodes in entire catalog
Click Linked to all Taxonomy Nodes in entire catalog to download all digital assets linked to all taxonomy nodes of the catalog. The following screen appears.

The count of all assets present in all the taxonomy nodes is displayed. Refer section 17.13 Downloading Assets for detailed steps on how to download the assets.
Case 2: Assets linked to selected taxonomy nodes
This option will be enabled only once you select the nodes as shown below.

Click Linked to selected nodes to download only those assets which are linked to the selected nodes. In this case, you first need to select the nodes having assets to be downloaded.
The following screen appears.

Also, in this case, you have an option to select if you want to include assets linked to child nodes of the selected nodes as well. By default, No is selected which means assets of only the selected nodes are counted.
Click Yes to include assets of child nodes associated with the nodes selected and the count will be updated accordingly.
Refer section Downloading Assets for detailed steps on how to download the assets.
Editing Assets Linked to Nodes
You can edit multiple assets linked to all / selected taxonomy nodes. A detailed description on how to create templates required to edit the images, the various operations that can be performed on the templates and how to view the processed images is explained in section 0
Batch Editing of Multiple Images. Let us understand how to edit assets linked to nodes from the taxonomy panel itself.
To edit assets linked to nodes:
Click the Assets
 icon and then click Edit Photo Assets as shown below.

OR
Select and right-click the nodes having assets to be edited and then click Assets > Edit Photo Assets as shown below.

NOTE | In this case, since the nodes are selected manually, the third option Linked to selected node(s) is also enabled. |
The following 3 options are displayed:
Linked to all node(s) in this catalog – This option will always be enabled. Select this option to edit all images linked to all nodes of the catalog. If there are multiple hierarchies in a catalog, all images present in nodes across all hierarchies will be considered here. For example, if there are 3 assets linked to nodes in the primary hierarchy, and 2 assets linked to nodes in another hierarchy, selecting this option will display the number of assets as 5.
Linked to all node(s) in this hierarchy – This option will always be enabled. Select this option to edit all images linked to all nodes of the catalog for the currently selected hierarchy. If there are multiple hierarchies in a catalog, for example, primary and secondary hierarchies. If you are currently editing images in the primary hierarchy, all images present in all nodes for the primary hierarchy will be considered here. If you need to edit assets present in the secondary hierarchy only, you first need to select the hierarchy as secondary and then select this option.
Linked to selected node(s) – This option will be enabled only when nodes are selected. Select the nodes and then select this option to edit those images which are linked to the selected nodes. Also, in this case, an additional option to include or exclude assets linked to child nodes of the selected nodes will also be displayed.
If any of the first 2 options are selected, the following dialog box appears.

If the option Linked to selected node(s) is selected, the following dialog box appears.

Here, an option to include or exclude assets linked to child nodes of selected nodes for editing is available. By default, No is selected. If you need to edit assets of all child nodes, select Yes and the count will be updated based on the number of assets present in all the child nodes for the selected nodes as shown below.

There are 4 steps to be performed to edit the images. Refer section Editing Images from the DA Library for complete details on how to perform these 4 steps to successfully edit the images.
NOTE | If a same asset (for example, Watch.jpg) is used in multiple nodes or across hierarchies, the count displayed for editing assets will always consider it as a single asset as the same asset is being used in other nodes or hierarchies. |
Generating Taxonomy Detail Report
A taxonomy detail report is an excel report listing details of all the nodes present in the catalog for the currently active hierarchy. Details such as name of the node, taxonomy path, metadata information, count of nodes in the hierarchy, linked assets to a node and so on are detailed in the report.
NOTE | The report will be generated for the entire catalog depending on the hierarchy selected. If you need to generate a report for a catalog in a non-primary hierarchy, you need to first select that hierarchy and then generate the report. |
To generate a taxonomy detail report:
Click the Detail Report
 icon by selecting the relevant hierarchy as shown below.

The following message is displayed.

An email notification is sent to the account registered with PCC once the report is executed with a link to download the excel as shown below.

You can download the excel file by clicking the link. The name of the catalog along with the date on when the report was executed is listed in the email sent.
Click Download File and the report is downloaded in the local drive.
The following table lists all the details present in the excel report generated.
Field | Description |
|---|---|
Level 1 Node Name | Displays the name of the topmost / root node in the hierarchy. |
Level 2 Node Name | Displays the name of the second level / branch node which has a child node in the hierarchy. |
Level 3 Node Name | Displays the name of the third level node in the hierarchy. Note: This could be a branch node if there are more nodes under it or leaf node if it is the last node in the hierarchy. |
Taxonomy Path | Displays the complete path of the nodes based on the hierarchy present in the catalog. |
Customer Taxonomy Id | Displays the unique taxonomy ID associated with each node in the hierarchy. |
Node Type | Displays the type of node in the catalog, that is, if it is a root / branch / leaf node. |
Description | Displays the description added for the node. |
Review Status | Displays the any of the following statuses:
|
Meta Tags | Displays all the meta tags associated with the node. Note: In case of multiple meta tags, all are displayed in the same column. |
Meta Attribute: <Name> | Displays the meta attribute value added for a node. Note: All the meta attributes associated with a node are displayed in separate columns. |
Node Count (Hierarchy) | Displays the count of nodes based on the hierarchy. In case of root nodes, it will show the count of branch and child nodes present. Similarly, for branch nodes, it will show the count of all child nodes present. However, in case of child nodes, the count will be 0 as it is the last level in the hierarchy and will not have any nodes under it. |
Node Count (Immediate Children) | Displays the count of all immediate child nodes associated with a node. In case of root nodes, it will show the count of all immediate nodes, that is, branch nodes. However, if there are no branch nodes, it will show the count of all child nodes. Similarly, for branch nodes, it will show the count of all child nodes present. However, in case of child nodes, the count will be 0 as it is the last level in the hierarchy and will not have any nodes under it. |
Schema Count (Hierarchy) | Displays the number of schema attributes associated with all the nodes in a hierarchy. In case of root nodes, it will show the count of all schema attributes present in the branch and child nodes as well. Similarly, for branch nodes, it will show the count of schema attributes present in all the child nodes as well. However, in case of child nodes, the count will be 0 as it is the last level in the hierarchy and will not have any nodes under it. |
Schema Count (Self) | Displays the number of schema attributes associated with each node in the hierarchy. |
SKU Count (Hierarchy) | Displays the number of SKUs associated with all the nodes in a hierarchy. In case of root nodes, it will show the count of all SKUs present in the branch and child nodes as well. Similarly, for branch nodes, it will show the count of all SKUs present in all the child nodes as well. However, in case of child nodes, the count will be 0 as it is the last level in the hierarchy and will not have any nodes under it. |
SKU Count (Self) | Displays the number of SKUs present in each node in the hierarchy. |
Validation Failed SKU Count (Hierarchy) | Displays the number of validation failures observed in SKUs associated with all the nodes in a hierarchy. In case of root nodes, it will show the count of validation failures for all SKUs present in the branch and child nodes as well. Similarly, for branch nodes, it will show the count of validation failures for all SKUs present in all the child nodes as well. However, in case of child nodes, the count will be 0 as it is the last level in the hierarchy and will not have any nodes under it. |
Validation Failed SKU Count (Self) | Displays the number of validation failures observed in SKUs present in each node in the hierarchy. |
Linked Digital Assets | Displays the link of digital assets associated with each node in the hierarchy. |
NOTE | The report generation process might fail in case of any error and in such cases an email notification with a failure message is sent stating the same. In case of a failure, you can try to generate the report again or contact the Bluemeteor Customer Success team for assistance. Also, this report contains information on SKUs only and does not include details on PFs associated with nodes. |
Auto generating a SKU Title
SKU titles can be generated by applying formulas for SKUs present in the selected nodes. An overview on SKU titles is provided in section 8.1.1.1 Auto Generating SKU Title and a detailed description on how to create formula in the formula master and the various actions that can be performed on the formulas is provided in chapter Formula Master.
You can generate SKU titles for any SKU in the catalog by selecting the node containing the required SKUs. Also, once a SKU title is generated using a formula, you can apply any formula to the same SKUs. In this case, the SKU titles will be overwritten based on the new formula applied.
Let us auto generate SKU titles for all the SKUs present in the Analog node for watches. In this case, the formula is being applied for the first time to the Analog node.
To auto-generate SKU titles for SKUs in nodes with no pre-existing formula:
Select the node containing SKU for which you need to generate the SKU title using the formula and then click the Manage SKU Title
 icon as shown below.

The following dialog box appears.

Select Formula
Select the formula to be applied for the SKUs. Let us select the formula ‘SKU title for Watch’ and then click Next as shown below.

NOTE | You can only select one formula to be applied for generating the SKU title. |
Select More Node(s)
Since the node is already selected, it will be displayed here. You can select multiple nodes or click Select All Nodes to apply the formula for all the nodes, that is, SKUs present in all the nodes as shown below.

Click Next and the following screen appears.
Set Preferences

Based on the formula selected, complete details of the formula are displayed. You can click the View Formula  icon to view the details of the formula as well. Here, you have an option to set a character limit for the SKU title, that is, you can decide the length of the SKU title based on the number of characters.
Click Maximum Character Limit for SKU Title and the following is displayed.

By default, the limit is set to 255 characters, that is, the SKU title can contain 255 characters only. If it exceeds the limit, those characters will not be included in the title. You can move the slider to adjust the character limit as needed.
Click Next and the following screen appears.
Confirm

Complete details of the nodes and the formula selected is displayed.
Click Submit and the SKU title is auto generated for all the SKUs present in the Analog node.
NOTE | If the SKUs already have SKU titles defined, it will be overwritten based on the formula applied. |
The node to the which the formula is applied will be updated with the icon as shown below indicating that a formula has been applied on a node.

You can view the SKU titles generated for the selected nodes in the SKU view as shown below.

Let us assume there is some change in the formula applied for all the SKUs present in the same Analog node for watches. In this case, the formula is already applied to the Analog node.
Let us see the process to auto generate SKU titles which have already been generated using a formula.
To auto-generate SKU titles for SKUs with pre-applied formula:
Select the node containing SKU for which you need to generate the SKU title using the new formula and then click the Manage SKU Title
 icon as shown below.

In this case, the formula is already applied to the node Analog.
The following dialog box appears.

Since the node selected already has a formula applied, details of the existing formula are displayed along with the various options available.
Click the View Formula
 icon on the upper-right corner to view the details of the formula already applied to the node as shown below.

Details of the already applied formula are displayed. Here, you also have the option of applying the formula to multiple SKUs at once which are as follows:
Only to the SKUs of this node – This will apply the formula to the SKUs of the selected node only which is Analog node, in this case.
SKUs in Entire Hierarchy of the node – This will apply the formula to the entire hierarchy. In this case, the hierarchy is Accessories > Watches > Analog. Thus, the formula will be applied to all SKUs in the node Accessories and Watches as well.
All SKUs in this catalog – This will apply the formula to all the SKUs present in the catalog.
SKUs of specific node(s) – Once this option is selected, you can then select the nodes which contain the SKUs as shown below.

Select the required nodes from the hierarchy and the formula will be applied to the SKUs of the selected nodes only.
SKUs of Node(s) having same formula – This will automatically apply the formula to all the nodes having the same formula.
Let us select the option SKUs of specific node(s).
Click SKUs of specific Node(s) to apply the formula to SKUs of selected nodes and the following is displayed.

Here, you can select the nodes. Let us select the node Analog, which already has a formula applied and another node Watches for which no formula has been applied as shown below.

To apply a different formula, click the Change Formula  icon on the upper-right corner and the following screen appears.

You can select the required formula from the formula master to be applied on the selected nodes. Let us select the formula ‘New SKU Title for a Watch’.
Select the formula and then click Change Formula to apply the new formula for generating SKU titles.

If the node selected already has a formula applied, the current formula will be replaced with the newly selected formula and the SKU titles will be overwritten. However, if the node selected has no formula applied, the formula will be applied and the SKU title will be generated accordingly.
The following screen appears.

Click Save Changes and the new formula selected is now applied to the selected nodes as shown below.

If the SKUs selected for applying the formula do not contain any of the entities present in the formula, those will be not be added in the SKU title.


The first SKU title has all the entities as defined in the formula. The second SKU title as mentioned does not have does not have the Brand attribute defined. Hence, the SKU title starts with the taxonomy node name (Analog) directly as it is the second entity in the formula.
NOTE | Once a formula is associated with a node, the SKU title will automatically be generated for any new SKU being added to that node. However, if a SKU is moved to another node, the SKU title will continue to exist if the new node does not have any formula applied to it. If the node where the SKUs are moved has a different formula, the SKU titles will then be overwritten based on the formula associated with this node. If a SKU title is already configured to use a formula in the catalog, it should not be updated through the import file. However, if a SKU title is not configured in the catalog, the import should update the SKU title. Also, if the import file does not contain any data for SKU title, that is, the SKU title is blank, the existing not null data in the catalog should not be overwritten. |
Removing a Formula Applied on SKUs
You can also remove a formula applied on SKUs if they are no longer relevant. However, all the SKU titles that have been generated using the formula being removed will continue to exist. Once the formula is removed, the formula is dissociated from the node and will not be applied on the SKUs which will be added in the node in future.
To remove a formula applied on SKUs:
Select a node for which formula has been applied. Let us select the node Watches as shown below.

Click Manage SKU Title and the following screen appears.

Details of the existing formula applied are displayed.
Click the Clear Formula
 icon on the upper-right corner and the following dialog box appears.

Click Clear Formula and the formula will be removed for all the SKUs present in the selected node. In this case, the icon will be removed from the node Watches as shown below.

Additional Features Related to a Node
In addition to the above-mentioned operations for the node, there are a few more features available which are listed in the following table.
To | Do this | Description |
|---|---|---|
Refresh a Node | Right-click the node and then select Refresh Node. | Any changes made in the node are updated after you select this option. |
Export a Node | Right-click the node and then click Export Node. You can export data for a specific node in the required format. Also, you can select multiple nodes from which SKU data has to be exported and then click the Export SKU for selected Node | A detailed description about exporting data from a catalog is available in section Export Catalog. |
Sort a Node | To sort a node in ascending order:
The node is sorted alphabetically in ascending order. To sort a node in descending order:
The node is sorted alphabetically in descending order. Also, you can perform the same operation by selecting the Tree Controls Before Sorting After Sorting in ascending order
| Here, you can sort the nodes (root/branch nodes that have nodes within it) in ascending or descending order depending on how you need to arrange your nodes. Note: You can also sort a part of the taxonomy tree by selecting the relevant root/branch node and all the subsequent child nodes will be sorted or sort the entire tree by selecting the root nodes. |
View Schema Constraints Validation |
The Validation Summary listing the failed constraints, attributes and SKUs are displayed. Click View Validation Details to view the details of failures for each SKU belonging to the node. | You can view a complete list of failed validation constraints, attributes and SKUs for the selected node and its child node as well. This will enable you to rectify the errors as you know the exact location of the failure. A detailed description on schema constraints is mentioned in Schema Constraints |
Copy Taxonomy Path | Right-click the node and then select Copy Taxonomy Path to copy the path for the selected node. | This copies the full taxonomy path to the clipboard. |
Open/Close All Nodes | Select the Tree Controls | This expands or collapses the tree structure. |
Deselect All Nodes | Select the Tree Controls | This clears all the selected nodes and the respective information from the middle panel is also removed as no node is selected. |
Search a Node | In the search bar area right above the taxonomy tree, you can either search the node name or metadata information to locate the nodes.
In the first panel, select Search Node to search the node or select Search Metadata to search nodes (all nodes having the meta tag or meta attribute entered) associated with the metadata from the drop-down list as shown below.
| You can search for any node in the taxonomy tree using node names or metadata information. |
Show/Hide Node Related Information | Click the
For example, let us select SKU Count, Nodes Meta Information and Linked Digital Assets to be displayed for all nodes. The following screen is displayed.
In case of digital assets, when you hover the mouse on the count displayed, a thumbnail of the primary image is displayed as shown below.
The icon Also, you can view the nodes which are under review as shown below.
The following is displayed.
As shown above, all the nodes which are under review are highlighted in the color similar to the icons used. For example, a node indicated in purple icon is used when the node to be edited is under review. Thus, a light purple background color is indicated on the node. Similarly, other nodes are highlighted in respective colors. | For each node, you can view the number of SKUs present, the child nodes created, digital assets associated as well as those under review, cross listed SKUs, passed/failed schemas, nodes that are under review, meta information for each node, if added and the status of the SKU title formula. |
 icon as shown below.
 arrow and then click Sort Nodes ascending or Sort Nodes descending based on how you need to sort the nodes.

 arrow and then click Open/Close All Nodes to open/close the nodes.
 arrow and then click Deselect All Nodes to clear all the selected nodes.

 icon to view the following node related information as shown in the following figure.
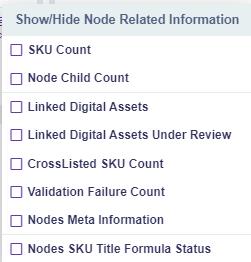

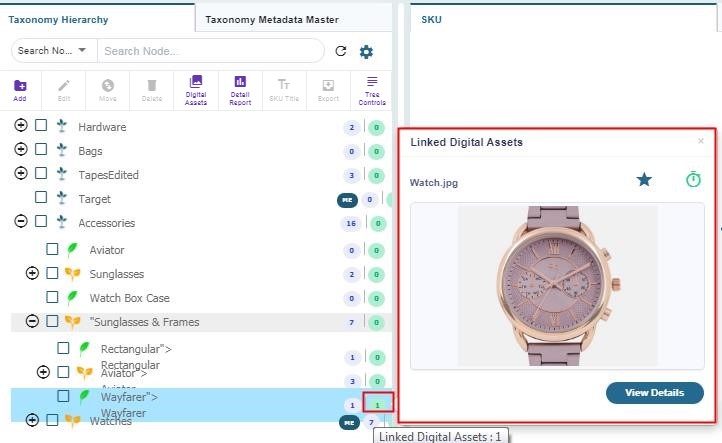
 for nodes that have meta tags / meta-attributes associated is also displayed, by default.

Working with Taxonomy Metadata Master
Taxonomy metadata is defined as the additional information associated with each taxonomy node in a catalog. There are two types of metadata:
Meta tags - A simple metatag consisting of a single string of characters associated with the node. The meta tags can be defined and associated to nodes during node creation or while editing nodes. You need to create new meta tags which will then be available for selection from a master list of metatags while adding or editing nodes. This works similar to attribute metatags as explained in section 0 Working with Attribute Meta Tag Master List. This meta tag provides a more structured definition about a node.
Meta attributes - A meta-attribute is a name-value pair, that is, a user defined name of a meta-attribute stored as a master list of meta-attributes which are eligible to be associated to any taxonomy node. The only difference between meta tags and meta-attributes is that when meta-attributes are associated with a node, the meta-attribute must also have a value. This value needs to be added while creating / editing a node. Like meta tags, you need to create new meta-attributes which will then be available for selection from a master list of meta-attributes while adding or editing nodes.
For example, we have a node Watches. We can associate a meta-attribute to this node to bring more clarity on what exactly this node conveys. Let us have a meta-attribute named Watch type which will be associated with node Watches. A value ‘Types of analog and digital watches’ can be added while creating /editing a node which will then be associated to node Watches. Refer section 6.3.1.2 Adding Nodes for details on how to associate meta-attributes to nodes.
NOTE | The meta tags and meta-attributes are customer specific, that is, the same meta tags can appear across multiple catalogs for the same customer. |
Click the Switch to Taxonomy Metadata Master tab to switch to this view as shown below.

Let us understand how to add, edit and delete taxonomy meta tags as well as meta attributes in the following sections:
Adding a Taxonomy Metadata
To associate nodes with meta tags / attributes, it is important to first add them in the metadata master list. Only those metadata which are added in the list will be available for association while adding or editing a node.
Case 1: Adding a meta tag to a metadata master list
To add a new meta tag:
Click the Meta Tags tab and the following is displayed.

A list of already created meta tags if available is displayed.
Click the Add Taxonomy Metadata(s)
 icon. The following dialog box appears.

By default, Meta Tag option is selected.
Type the Meta Tag Name to be given for the meta tag. For example, tag 1.1.
Type the Meta Tag Description that describes the tag added in step 3. For example, tag for node accessories.
Click the Add More Metadata(s)
 icon to add multiple tags at once as shown below.

Click the Remove
 icon to remove any meta tag here.
Click Add Taxonomy Meta Tag and the meta tag is added to the master list as shown below.

Case 2: To add a meta attribute to a metadata master list
To add a taxonomy metadata for meta attribute:
Click the Meta Attributes tab and follow the steps 2 to 7 as mentioned for meta tabs above. Here, instead of meta tags, the details will be added for meta attributes.
Once the meta tag and attributes are added to the list, you can associate them to nodes while adding or editing the nodes as explained in section Adding Nodes and Editing Nodes.
NOTE | While you are adding the data for meta tags, if you switch to meta attribute without adding the meta tag, all unsaved changes will be lost. |
Editing a Taxonomy Metadata
The meta tags and meta attributes existing in the metatag master list can be edited. In both cases, the process to edit is the same.
To edit the taxonomy metadata for meta tags/ attributes:
Select the meta tag / meta attribute to be edited and then click the Edit Taxonomy Metadata(s)
 icon. For example, the meta tag ‘tag 1.1’ is selected. The following dialog box appears.

Make the changes as needed and click Edit Taxonomy Meta Tag. The changes are updated and reflected in the master list.
Similarly, select the relevant meta attribute to edit it as well.
Deleting a Taxonomy Metadata
You can delete meta tags and meta attributes created. However, you cannot delete them from the master list directly:
If the meta tag or meta attribute is associated with any taxonomy node - In this case, if you try deleting them, a summary of the count of nodes and name of the node (complete taxonomy path) having meta tags / meta attributes is displayed as shown below.

If you choose to delete, the meta tags / meta attributes will be removed from the respective nodes, that is, the association will be removed and they will also be deleted from the master list.
To delete a taxonomy meta tag or meta attribute that is not associated to any node:
Select the meta tag / meta attribute and then click the Delete Taxonomy Metadata
 icon. The following dialog box appears.

Details about the meta tag / meta attribute selected for deletion are displayed. It will show the count of associated nodes, if any. In this case, it will be 0 as there is no association to a node.
Click Delete Meta Tag, in this case and the attribute meta tag is deleted successfully from the master list.
NOTE | You can only delete one meta tag / meta attribute at a time. |